In this simple tutorial I'll show you how to write a simple Hello world application using Mono for Android framework and some of its key features.
Mono for Android features
Nice thing about Mono for Android for .NET developers is that you can start writing application using C# and its well known features:
delegates, events, anonynmous methods, LINQ... Also there is support for working with Java, C and C++ libraries, dynamics language features, lambdas, LINQ, parallel programming, base class library which contains great collection of classes to work with XML, database, IO, networking, strings...
Writing your first Hello world application
More details on how to install Mono for Android can be found here. The following steps will show you how to create a new project and write a simple Hello world application using MonoDevelop.
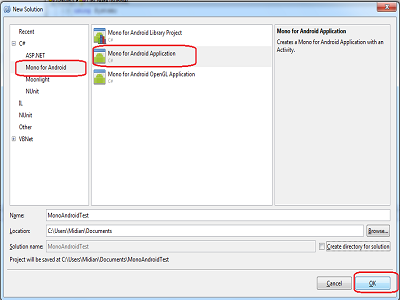
1. Create a new solution.

2. Select Mono for Android Application
Below is a simple Hello world example. As you can notice your class derives from the base Activity class. Activity is a main building block for Android applications. You can imagine it as a Page in ASP.NET, and it also has its life cycle (more can be found here.) Note that OnCreate method was overriden and used to attach to the button's event and set its behaviour. That method is called when the activity is created and it is a good place to make some initial settings and bind data to your controls.
using System;
using Android.App;
using Android.Content;
using Android.Runtime;
using Android.Views;
using Android.Widget;
using Android.OS;
namespace MonoAndroidTest
{
[Activity (Label = "MonoAndroidTest", MainLauncher = true)]
public class Activity1 : Activity
{
protected override void OnCreate (Bundle bundle)
{
base.OnCreate (bundle);
SetContentView (Resource.Layout.Main);
Button btn = FindViewById<Button> (Resource.Id.btn);
TextView lbl = FindViewById<TextView> (Resource.Id.lbl);
btn.Text = "Click Me!";
btn.Click += delegate {
lbl.Text = "Hello world"; };
}
}
}
In this sample application I did not use an ordinary way to add a UI elements by instancing them directly in code. Instead I used XML and by calling FindViewById ("someId") I was able to get reference my UI element and manipulate them in any way I want. An example of XML is below:
<?xml version="1.0" encoding="utf-8"?>
android:orientation="vertical"
android:layout_width="fill_parent"
android:layout_height="fill_parent"
>
<Button
android:id="@+id/btn"
android:layout_width="fill_parent"
android:layout_height="wrap_content"
/>
<TextView
android:id="@+id/lbl"
android:layout_width="fill_parent"
android:layout_height="wrap_content"
/>
</LinearLayout>
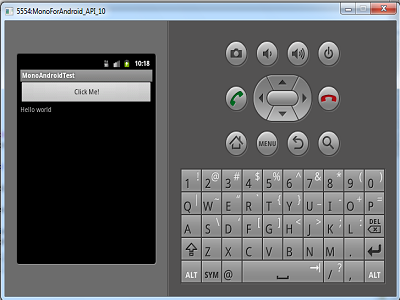
All the code is ready so we can run our application and see the result. You can use Ctrl + F5 to run the application, select emulator. You should get the following screen:
This was very simple Hello world application using Mono for Android. I used a really basic stuff from this awesome framework and MonoDevelop development environment - new project creation, using XML for user interface creation and working with activities.