The goal of this post is to present detailed, step-by-step instructions on how
to install, modify and maintain themes (skins) in MonoX-based projects. As you probably know, a theme is a collection of property settings and resources that allow you to define the look of pages and controls, and then apply the look consistently across pages in a Web application. Designers of MonoX-based applications will spend most of their times working with themes, and some of our users do not go beyond making design changes to their applications. Therefore, it is very important to grasp the basic concepts and follow the techniques described below in order to develop a standardized and maintainable front ends for your applications.
1. MonoX themes
1.1. Intro
With the new MonoX 4.9 release, we have made some changes related to theming functionality. Some of the techniques described here will also be useful in older versions, but we will focus on the current version. New theme that comes with MonoX 4.9 also contains a skin chooser which allows you to easily modify your themes.
One of the major changes in the new "Modern" theme is switching functionality based on SASS and Zurb Foundation framework. SASS is a meta-language on top of CSS that’s used to describe the style of a document cleanly and structurally, with more power than flat CSS allows. SASS both provides a simpler, more elegant syntax for CSS and implements various features that are useful for creating manageable stylesheets, so basically SASS is an advanced version of the plain old CSS. Installation and usge of SASS is explained in one of our previous posts witch you can find here, and is also very well explained on the Zurb Foundaton website here.
Zurb Foundation is a framework built on SASS (in our case), which contains predefined styles for Grid, Typo, Buttons, Navigation, Forms, UI Elements and other components of website layout. It is extremely modular and allows you to use just the components you need, and modify them in an easy way. More about Using Zurb Foundation can be found here.
In addition to SASS and Zurb Foundation, we also use Compass, which is a bundle of SASS functions that allows us to work faster and easier. More about Compass can be found here.
These new technologies together make MonoX themes easier to use and to modify. Our recommendation is to explore both SASS and Zurb Foundation documentation before proceeding to custom styling tasks on MonoX.
1.2. Basic theme structure
MonoX theme is a bundle of files and folders that builds and style your MonoX application. New theme that comes with MonoX 4.9 was redesigned from the ground up. See the picture below for a comparison of the new and old theme structure.
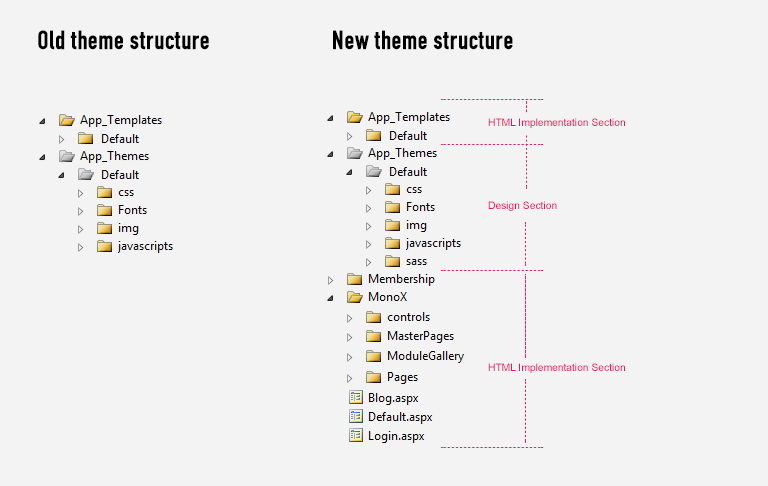
Image 1.
If you look at Image 1. you can see that we have divided MonoX theme content into two sections. First section - “Design Section” - contains SASS, CSS, images, javascripts and font files. Second - called “HTML implementation Section” - mainly holds the HTML structures and related CSS classes for pages, controls, web parts and web part templates. You will see later how this separation provides a way for easier development and maintenance of your application UI.
1.2.1. Design Section
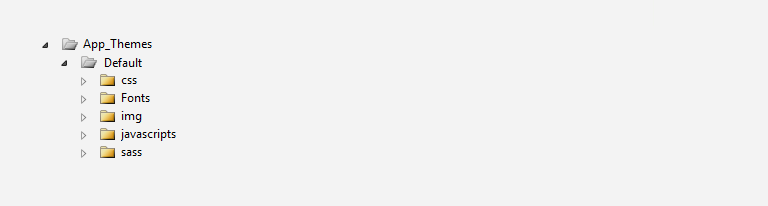
Image 2.
Design section holds a folder App_Themes as a root folder (if you have more than one theme installed, you will have more than one folder here). Its subfolders contain standard styling resources such as CSS, fonts, images and javascript files, as well as a SAAS folder. If you browsed through the SASS and ZURB Foundation documentation, you will understand that we don't use CSS directly any more - SASS is compiled into CSS via Ruby.
1.2.1.1. Including external files
It is important to understand that all CSS files are referenced automatically by the ASP.NET engine when they are placed inside App_Themes folder, while javascript resources need to be included manually. Scripts that are used across the project should be referenced in Master pages, while page (or page section)-based scripts should be referenced in their page templates, pages or controls/web parts. You can use the code below to reference a javascript file.
<asp:ScriptManagerProxy ID="gridScriptManager" runat="server">
<Scripts>
<asp:ScriptReference Path="/App_Themes/Default/javascripts/myscript.js" ScriptMode="Auto" />
</Scripts>
</asp:ScriptManagerProxy>
1.2.2. HTML implementation section
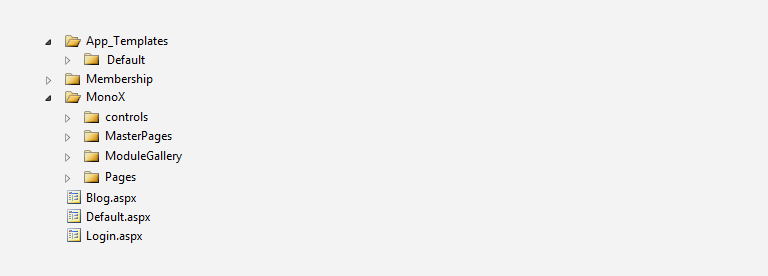
Image 3.
HTML implementation section holds a number of folders with supporting HTML markup and additional resources related to the specific theme.
App_Templates folder contain web part templates - snippets of HTML that holds the layout for one data item in the repetitive web parts and controls. They are bound to a specific theme and placed into the folder with a theme name.
Membership folder holds pages with functionality related to user membership (registering, password and email recovery, ...).
MonoX folder contains all general elements that are used accross your application. It contains master pages, page templates and content pages, controls and web parts. Its usage is explained later in this post.
This section holds a few "standalone" pages - Default, Login and Blog. Default.aspx is a default entry point/home page for your application.
1.3. Installation of the new MonoX theme
Fresh installation of MonoX comes with a Default theme installed. If you wish to install a new theme, you will have to download it from our website. Theme installation package is basically a .zip file which can be extracted into the root folder of your MonoX installation.
1.3.1. Design section
By extracting theme in your root folder, a subfolder with the name of new theme will be created in the App_Themes folder containing all supporting resources.
1.3.2. HTML installation section
Same as before, after the extraction of the new theme is finished, the App_Templates folder will contain a subfolder with the name of the new theme.
Files in the MonoX and Membership folders, as well as standalone pages (Default, Login and Blog) will be overwritten by the new theme files.
1.3.3. Switching to new theme
After you have installed the new theme, just switch to it using the main web.config file as shown below:
<pages theme="YourThemeName" validateRequest="false" enableEventValidation="false" controlRenderingCompatibilityVersion="3.5" clientIDMode="AutoID">
...
and
...
<IconFolder Path="/App_Themes/YourThemeName/Sn/" />
2. building new pages in Monox
2.1. Building blocks of a MonoX page
Every MonoX project contains a set of pages (master pages and page templates), controls, web parts and web part templates that together describe its UI. The main organizational blocks used to build a page structure are content placeholders and web part zones - more details about page structure, content zones and placeholders can be found in MonoX documentation here. Here are step-by-step instructions for building MonoX pages.
2.1.1. Building pages
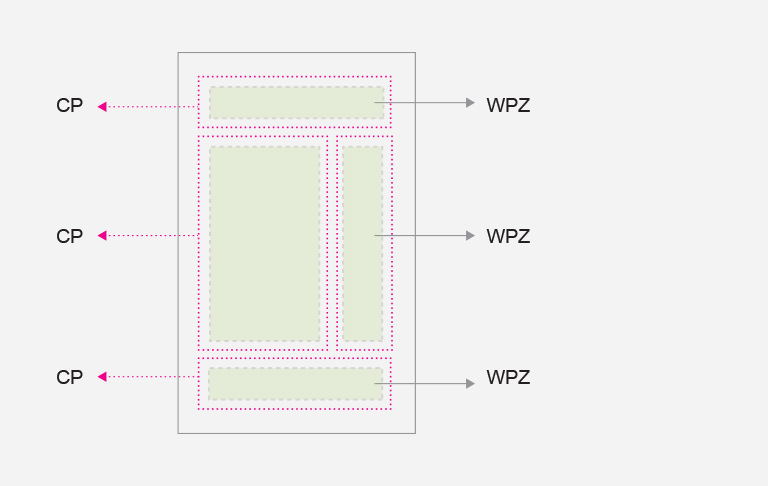
Image 4. CP – Content placeholder, WPZ – Web part zone
ASP.NET content placeholder is a basic structural block used to organize the page nesting hierarchy. Content placeholders mark the regions where various content controls - or child content placeholders - will be placed.
Web part zone is a control that allows you to include dynamic content on the page. It marks the region where you can drag and drop web parts in the administrative mode. Zones also give you the run-time control over the web part parameter and various other settings.
2.1.2. Nesteing pages in MonoX
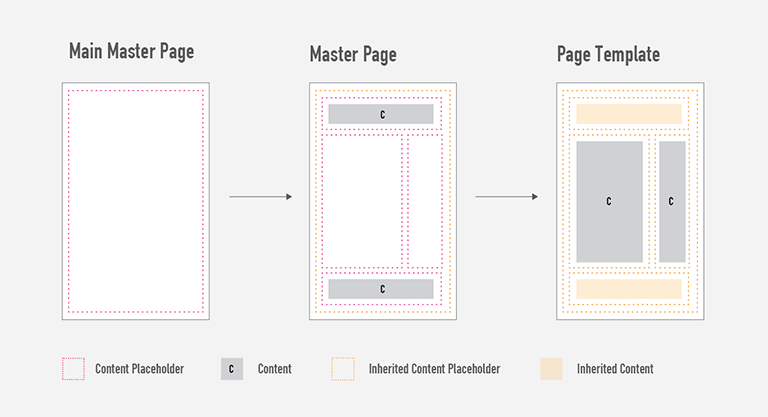
Image 5.
Main Master Page – contains basic HTML tags such as <html>, <head>, <body>, page title, basic scripts and CSS references etc. It also contains a Content placeholder which is used to hold nested nested master pages and their respective content.
Master Page – inherits Main Master Page and nests content into the content placeholder of the Main Master Page. Here you can build a layout grid, insert more placeholders (which you can leave empty if not needed), or you can fill it with the content common to all pages, such as header and footer. Naturally, you can have more than one master page to implement more layouts.
Page Template – inherits Master Page, and it includes other content elements. You can implement an unlimited number of page templates this way.
2.1.3. Building page templates
Grey areas on Image 5. marked as content are arbitrary MonoX elements that are used to compose a page:
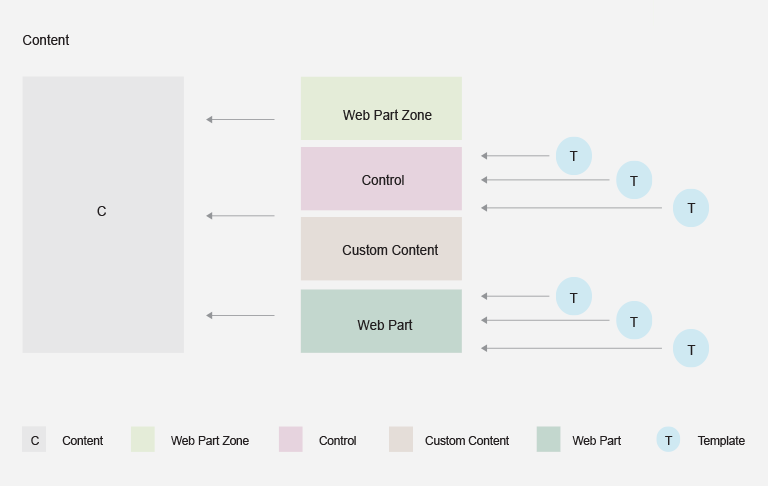
Image 6.
Web Part Zone – zone where you can add Web parts statically (via code) or dynamically (via administrative mode). Web parts can also live outside Web Part Zones, but their properties cannot be edited interactively. In this mode, they also cannot be moved around via the drag and drop operation.
Control – a control that implements arbitrary functionality
Web Part – basic functional building blocks of a MonoX application
Web Part Template – HTML snippets that hold the layout for one data item in the repetitive Web part sections
Custom Content – any other custom content.
Bellow you can see examples of page templates:
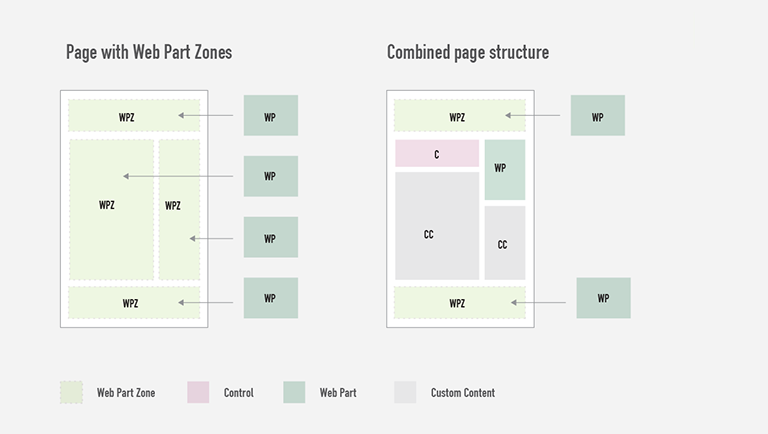
Image 7.
As you can see on Image 7. you can combine Web Part Zones and other content in any way you want.
Code example of a page that contains a control and a WebPartZone:
<%@ Page
Title=""
Language="C#"
MasterPageFile="/MonoX/MasterPages/Default.master"
AutoEventWireup="true"
CodeBehind="MyWebPart.aspx.cs"
Inherits="MonoSoftware.MonoX.Pages.Profile.MyFriends" %>
<%@ MasterType TypeName="MonoSoftware.MonoX.BaseMasterPage" %>
<%@ Import Namespace="MonoSoftware.MonoX.Resources" %>
<%@ Register TagPrefix="MonoX" TagName="MyWebPart" Src="/MonoX/ModuleGallery/MyWebPart.ascx" %>
<%@ Register TagPrefix="MonoX" TagName="MyControl" Src="/MonoX/Controls/MyContorlascx" %>
<%@ Register Assembly="MonoX" Namespace="MonoSoftware.MonoX" TagPrefix="portal" %>
<asp:Content ID="Content1" ContentPlaceHolderID="cp" runat="server">
<portal:PortalWebPartZoneTableless HeaderText="Title" ID="Zone1" runat="server" ChromeTemplateFile="RightColumnSimple.htm">
<ZoneTemplate>
</ZoneTemplate>
</portal:PortalWebPartZoneTableless>
<MonoX:MyControl ID="myControl1" runat="server"></MonoX:MyWebPart>
</asp:Content>
As you can see, we just have to reference the right master page and put the content inside the content placeholder using the arrangement that is suitable for our purposes.
3. Handling themes In NEW MonoX applications
3.1. Design section
As we mentioned before, all styling in the new theme is handled through SASS. In theory, you could just start editing the CSS file as before, but than you would loose all the benefits of the SASS approach - note that SASS would overwrite all the changes you made on every compile. Therefore, from now on we will use only the new, SASS-based approach.

Image 8.
In Image 8. you can see a sample of the SASS folder content. Default.scss contains numerous include functions that reference other SASS files. By doing this, we will end up with a single CSS file after SASS files are compiled. "Settings" files hold variables that are used throughout the project, and allow quick and easy property changes.
New theme includes various skinning options - changing color, font, font size, etc. Skin files are basically groups of variables which control the basic parameter values. You can change skins in Default.scss by uncommenting and commenting skin include functions.
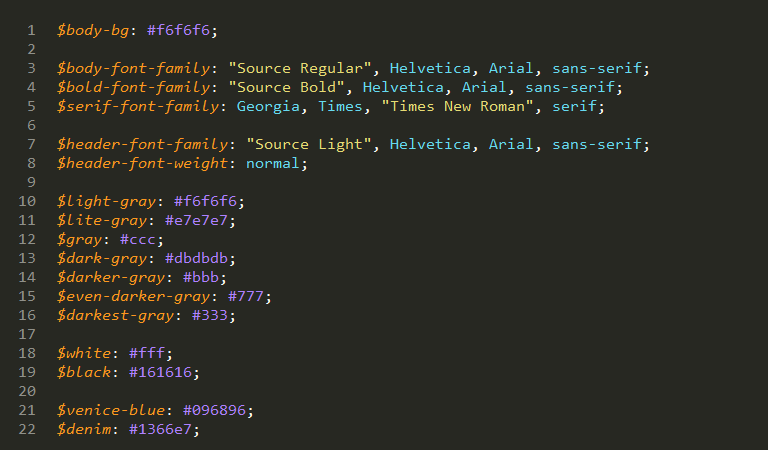
Image 9.
In Image 9. you can see a part of the skin file and its variables.

Image 10.
Image 10. shows how to include a theme in Default.scss file.
You can use our predefined skins, modify them or build your own skins. In case you want to modifying styling to a greater extent, you can go through other SASS files and change code there. As you can see in Image 8., beside some global styling files, every SASS file is responsible for a specific MonoX section.
3.2. HTML Implementation section
The best practice when using pre-existing MonoX themes is to keep files in this section unchanged as much as possible.
Note: New theme installation will overwrite all files in MonoX and Membership folder and also Default, Blog and Login pages.
So, as long as you perform all customizations by editing SASS(CSS) and Web part templates, and not doing any custom work on pages, controls, web parts and Default, Blog and Login.aspx, your application will be able to include new themes without any problems.
If you have to do custom work in those files, you should read the instructions below.
4. Handling themes in existing MonoX applications
If you have modified a default MonoX installation and you want to install a new theme, the installation process will be slightly different than previously explained.
4.1. Design section
New theme installation will create a new folder in App_Themes, nothing gets overwritten, so all of your custom work will remain stored in the old theme folder.
4.2. HTML Implementation section
App_Templates - new theme installation will create a new folder here, same as described in the Design section, so all of your custom work will remain stored in the old theme folder.
Problem comes with MonoX and Membership folder, and Default, Blog and Login pages.
Note: In order to keep your custom work in the HTML implementation section you should create a new folder in the root of your application named by your theme name. Copy all pages, controls and web parts from MonoX and Membership folders to it before you start installing a new theme.
Additionally, you should back up your Default, Blog and Login.aspx if any custom work was done on them.
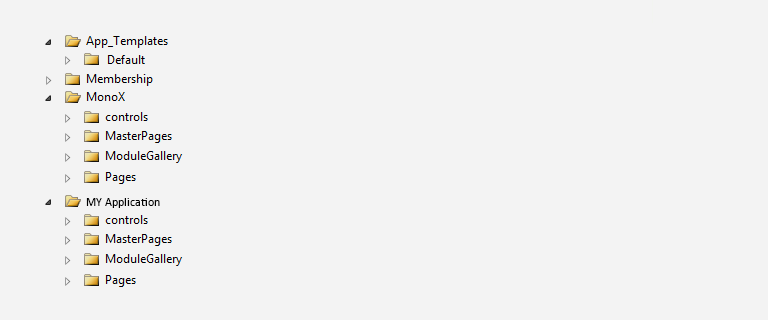
Image 11.
Image 11. shows how your folders should look like if you want your existing work to remain unaffected by the new installation.
Also, if you modified Default, Blog and Login.aspx prior to the new theme installation, you should restore them from the backup after the installation is complete and set up HTML structure and CSS classes to fit new theme rules.
Since the new theme will use new Web part templates from App_Templates, you should also check if any changes need to be done there.
5. Building a custom theme
Building a new theme from scratch would involve the next few steps:
5.1. Design
You will start your design work as usual: by drawing in Photoshop and slicing the finished materials into HTML, or by styling in the browser. The end result will include the SASS files, images, javascripts, font files, etc.
You should organize the resources withing the folders with self-describing names, as displayed below.
Image 13.
You should follow the guidelines from the existing MonoX themes. You can start by creating global styles and a global grid, and then go through individual sections and style them one by one, working simultaneously on SASS and HTML. There is a lot of styling and layout related stuff in the Zurb Foundation that can be used as is.
Use a static test HTML page to create your CSS classes, test styling and layouts, include fonts, test javascripts etc. When you get everything to work on the test page, you are ready to move everything into MonoX.
5.2. Managing HTML Implementation files
In this step you should copy your HTML structure and CSS classes from your test page, and start mopdifying your Default.aspx file. You should switch your theme in web.config as explained in the section 1.3.3., and include all custom javascripts as explained in section 1.2.1.1.
Now you are ready to start creating all other custom pages (explained in 2.1.1.) and modify individual page/web part templates as needed.
6. Conclusion
I hope that the material from this post will help you in styling your new or existing MonoX-based projects. Please free to contact us with all questions or comments.